Rules and Actions
Watch this great training video for in-depth information on how to configure rules and actions.
Rules
Rules specify the subset of charts that you want to apply actions to, such as different trip types, cardiac arrest, transport, refusals, etc. Here, you enter the name and then select the field or category that defines this chart subset.
To get to configure rules, go to Configuration > Service or Command > Code Tables. In the search box, enter Data Validation Rules.
On the Data Validation Rules page, you see a list of labels/names on the left pane. If you created rules in the past, you will see their names in this list. If you have not created rules, you may see some template items created by Onboarding when your system was new. Delete or reuse them as needed.
Now, build a rule:
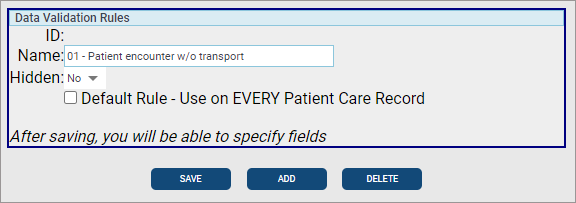
- Name: Enter the name of your rule. The name should represent the chart category. To stay organized, you may consider adding a number to the front of the name such as 01-Cardiac Arrest.
- Hidden: Use 'Hidden' for times you want to create a rule but are not ready to publish. ‘Yes’ temporarily turns it the rule off and grays it out in the left pane. ‘No’ publishes the rule and allows others to see/use it.
- Default Rule: Check this box to run this rule for every single PCR. If you want to specify some criteria for your rule, leave it unchecked.
After you click Save, click Add a field to select the subset of charts that you want to apply an action to. Actions will be added later.
- Category: Select the page or option within a chart. Options can have multiple data points so they get their own entry. If you are not familiar with the fields and options on each page, bring up a chart on another monitor while you are building your rule and use it as a reference.
- Column: Lists the fields in the system. Look for the fields or items on the page you selected in Category that will contain documented information supporting your rule.
- Operator: This is the inclusion or exclusion criteria used to trigger the rule. Some are 'this - or this is not' operators such as equal or not equal. In this case, only one criteria can be selected. Others are 'AND' operators such 'is one of'. This operator will allow you to choose as many criteria as needed.
- Criteria: Click the magnifying glass to see the picklist that is available for the column you selected. Depending on your operator, you can choose one or more items on the list. Make sure that the operator you selected makes sense with the criteria.
Click Save.
Let's stop and look at an example. We want to create a rule that deals with charts that have a patient encounter without a transport (name of our rule). We are not going to hide it or use it as a default rule.
Now ask yourself, what documented information in my chart tells me that there has been a patient encounter without a transport. In this case, we would want to select 'Page 1 - Dispatch Information' for the Category and the 'Disposition (Outcome)' field for the Column.
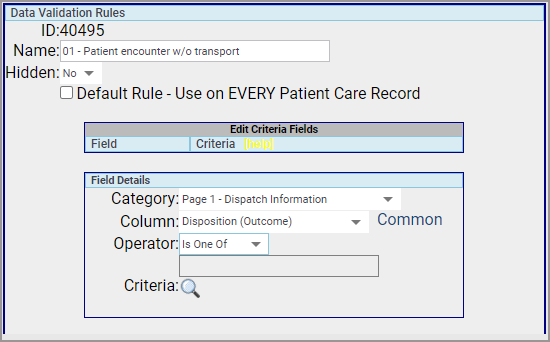
Since we select the 'is one of' operator, we will be able to pick multiple items from the picklist when we click the magnifying glass.
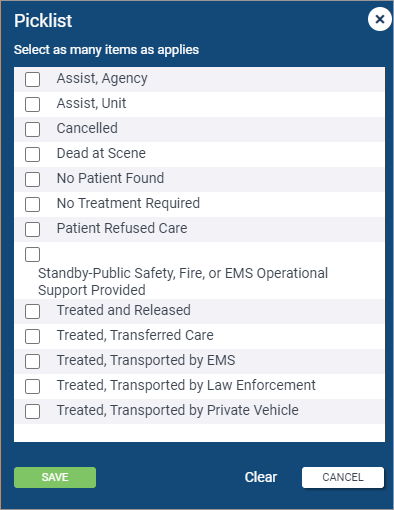
We'll click SAVE FIELD to save what we just did and then SAVE to save the rule.
If your rule is done, it's time to apply some actions.
Actions
Actions are what you want to see 'true' in the chart subset you defined in Rules. You can create as many actions as needed for a rule.
To get to configure rules, go to Configuration > Service or Command > Code Tables. In the search box, enter Data Validation Actions.
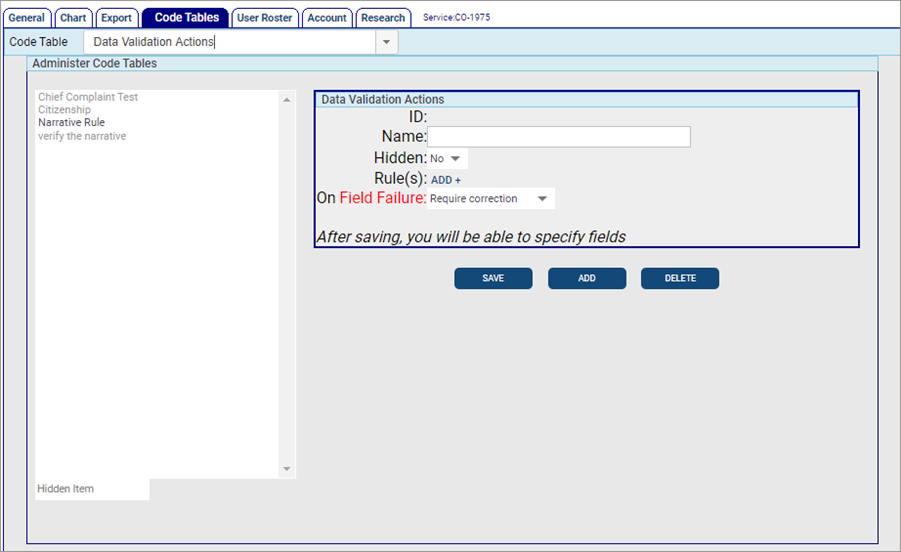
On the Data Validation Actions page, a list of labels/names display on the left pane. If you created actions in the past, the action name displays in this list. If the action is hidden, it will be grayed out.
Build the action:
- Name: Enter the name of your action. As we suggested for rules, it is a good thing to add a number to the front to keep the actions organized.
- Hidden: Use 'Hidden' to create a rule but not publish it. ‘Yes’ temporarily turns it the rule off and grays it out in the left pane. ‘No’ publishes the rule and allows others to see/use it.
- Rules: Click 'ADD' to select the rule for which you are going to apply this action.
- On field failure: Select what needs to happen if the action fails:
- Require correction: Before locking, the user must go back and fix the chart based on the action you specify and the instructions you provide.
- Require special report: Before locking, the user must generate a special report.
- Warn user: The user is warned that the field needs correction but can still lock the report.
Click SAVE.
Now, select the field or options you want to see 'true' in your chart.
- Category: Select the page or option within a chart. Options can have multiple data points so they get their own entry. If you are not familiar with fields and options on each page, bring up a chart on another monitor while you are building your rule and use it as a reference.
- Column: Lists the fields in the system. Select the field or item on the page you selected in Category.
- Operator: This is the inclusion or exclusion criteria used to trigger the rule.
- Some are 'this or this is not' operators such as equal or not equal. In this case you could only choose one criteria.
- Others are 'AND' operators such 'is one of'. This operator will allow you to choose as many criteria as needed.
- The 'Like' and 'Not Like' operators give you the ability to enter a word. Use the percent sign before and after the word to ensure that you capture all word variants for example %transport%.
- Criteria: Click the magnifying glass to see the picklist that is available for the column you selected. Depending on your operator, you can choose one or more items on the list.
- Alt Text: This is the error message that displays when the user tries to lock the chart. In this case we want to inform the user that they will need to go back to page two and in the Chief Compliant field, enter something other than transfer.
TEST! It is a good idea to go test your new data validation to ensure that it does what you want.
Example
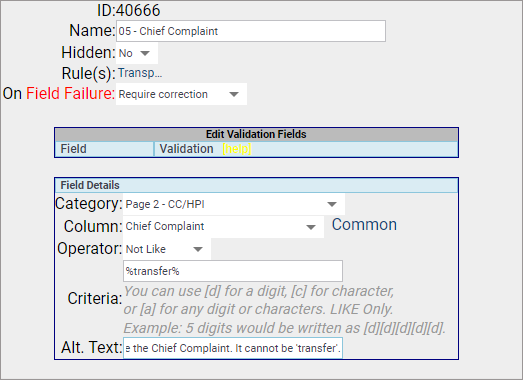
Time for an example. For all charts identified as 'Transports' by the 'Transported patient' rule, we want to add an action that stops users from entering the word 'Transfer' as a Chief Complaint. To do this we:
- Name: We will name this action 'Chief Complaint Not Like'.
- Hidden: Left the default set to ‘No’ since we want to use the action now.
- Rules: Selected 'Transported Patient' rule.
- On Field Failure: We want them to go back and correct this field before they can lock it so we selected 'Required correction'.
When we click Save, we see the name of the new rule appear in the left pane.
Now, we add a field.
- Category: The field (Chief Complaint) we want to impact is on page two.
- Column: For the column, we selected Chief Complaint.
- Operator: The purpose of this action is to prevent the user from entering 'transfer' in the Chief Complaint field so we selected the 'Not Like' operator and entered the word transfer. Notice the use of the percent signs (wild card) before and after the word. This ensures that we catch all variations of the word.
-
Alt Text: We entered a message that informs the user that they will need to go back to page two and in the Chief Compliant field, enter something other than transfer.
Requiring "All"
The 'Page 8 - Activity Log, Vitals, Actions' Category for Data Validation Rules and Actions has an "- All" version of many of the options. This is because a chart can have multiple Vitals and duplicate Procedures and you may want to require specific data be present on all entries of that type.
There are two unique ways to configure "- All" Validation entries. The first is to require all entries to have a certain field with no additional constraints. The second is requiring fields based on other conditions. Any Data Validation field option ending in "- All" can be used to require it for all entries that meet the criteria.
Note: This feature is only available in the new ZOLL UI (zoll.emscharts.com).
Require all Vitals/Procedures entries to have a certain field with no additional constraints
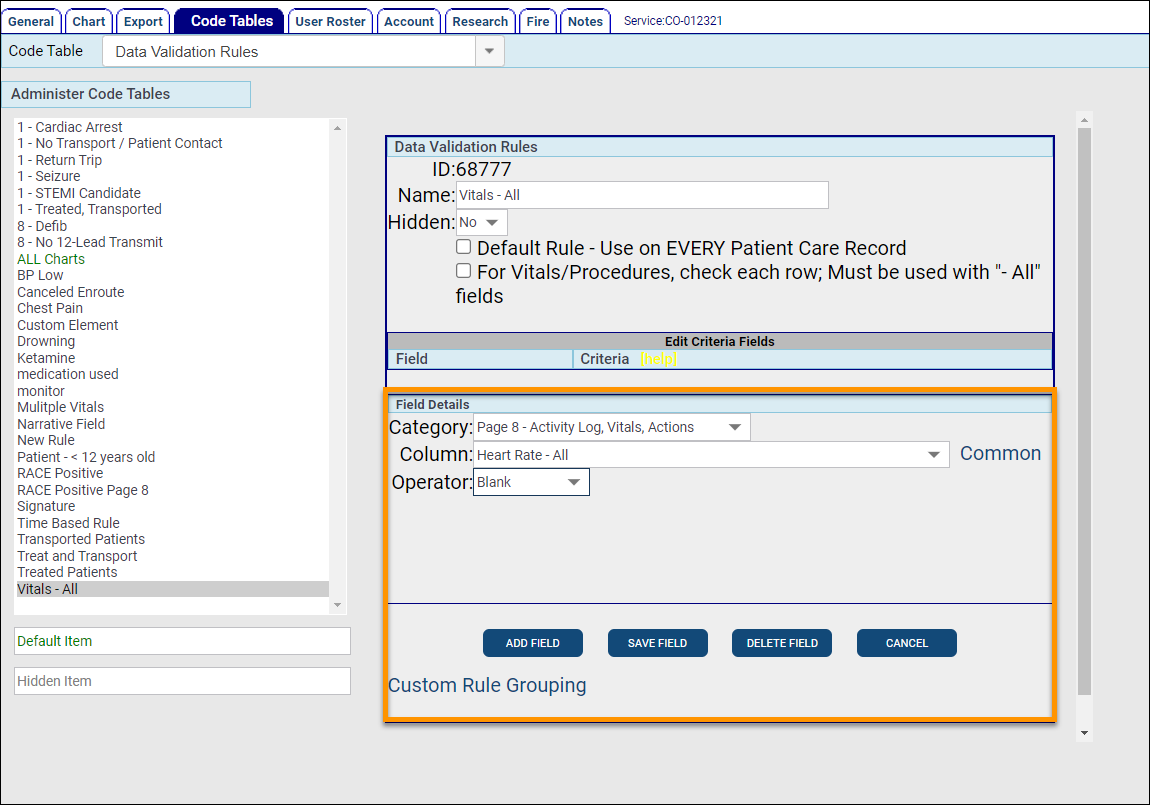
This can be applied to any Column (field) under the 'Page 8 - Activity Log, Vitals, Actions' Category that has "- All" items available for selection. For this example we are going to require all sets of Vitals have a Heart Rate.
-
Go to Configuration > Service or Command Fac. > Code Tables > Data Validation Rules.
-
Click ADD to create a new Rule, enter the name of the Rule, and click SAVE.
-
Click ADD FIELD to configure the Rule criteria.
-
Select 'Page 8 - Activity Log, Vitals, Actions' for the Category. Choose the field you wish to require from the Column drop-down (make sure it ends with "- All"), and select 'Blank' for the Operator. As you can see below, we are going to trigger our new Rule when there is a Vitals entry with no Heart Rate.
-
Click SAVE FIELD when finished with the field settings, and then click SAVE to save all changes to the Rule.
-
Go to Configuration > Service or Command Fac. > Code Tables > Data Validation Actions.
-
Click ADD to create a new Action. Enter the name of the Action and click ADD + to select the Rule to trigger the new Action. You can change the behavior for the 'On Field Failure' setting if you wish and click SAVE.
-
Click ADD FIELD to configure the Action criteria.
-
Select 'Page 8 - Activity Log, Vitals, Actions' for the Category. Choose the field you wish to require from the Column drop-down (make sure it ends with "- All"), and choose 'Not Blank' for the Operator. As you can see below, once we add a Heart Rate value to each Vitals entry that does not have one, we will satisfy our 'Vitals - All' Rule we created above.
-
Click SAVE FIELD when finished with the field settings, and then click SAVE to save all changes to the Action.
Now, every Activity Log entry added to a PCR will require that the field you chose is filled out. In our example, all Vitals entries must have a Heart Rate.
Require Vitals/Procedure fields based on other conditions
This can be applied to any Column (field) under the 'Page 8 - Activity Log, Vitals, Actions' Category that has "- All" items available for selection. For this example we are going to require the Lot Number for all narcotics administered.
-
Go to Configuration > Service or Command Fac. > Code Tables > Data Validation Rules.
-
Click ADD to create a new Rule, enter the name of the Rule, check the box 'For Vitals/Procedures, check each row; Must be used with "- All" fields', and click SAVE.
-
Click ADD FIELD to configure the Rule criteria.
-
Select 'Page 8 - Activity Log, Vitals, Actions' for the Category. Choose the field you wish to require from the Column drop-down (make sure it ends with "- All"), and select the proper Operator for your requirement. If applicable, click Criteria to choose additional items to trigger the Rule. As you can see below, we are going to trigger our new Rule when there is a Fentanyl, Midazolam, Phenobarbital, or Valium Medication Procedure entry.
-
Click SAVE FIELD when finished with the field settings, and then click SAVE to save all changes to the Rule.
-
Go to Configuration > Service or Command Fac. > Code Tables > Data Validation Actions.
-
Click ADD to create a new Action. Enter the name of the Action and click ADD + to select the Rule to trigger the new Action. You can change the behavior for the 'On Field Failure' setting if you wish and click SAVE.
-
Click ADD FIELD to configure the Action criteria.
-
Select 'Page 8 - Activity Log, Vitals, Actions' for the Category. Choose the field you wish to require from the Column drop-down (make sure it ends with "- All"), and choose 'Not Blank' for the Operator. As you can see below, once we add a Lot Number value to each Medication Procedure entry of Fentanyl, Midazolam, Phenobarbital, and Valium that does not have one, we will satisfy our 'Lot Number - All' Rule we created above.
-
Click SAVE FIELD when finished with the field settings, and then click SAVE to save all changes to the Action.
Now, every Activity Log entry added to a PCR will require that the field you chose is filled out based on the specified criteria. In our example, all Medication Procedure entries for Fentanyl, Midazolam, Phenobarbital, and Valium must have a Lot Number.

